
 |
|


After connecting a portable device like a smartphone using the Android operating system to your PC via USB you can access its files using Windows Explorer, but backing up these files using Personal Backup is not possible. The reason for this is that the Media Transport Protocol (MTP) used to connect the smartphone is only integrated within the Windows Shell used by Explorer. Devices connected in this way are not integrated into the Windows file system so that Personal Backup cannot access them.
The new add-on program Portable Device Backup provides a possibility to
backup files from such a device to a local storage medium (internal or external hard
disk or USB stick) or to a a network share. Optionally, the files can also be compressed.
It can be started via the Windows start menu. You can find it there in the
Personal Backup 6 program group under Portable device backup.
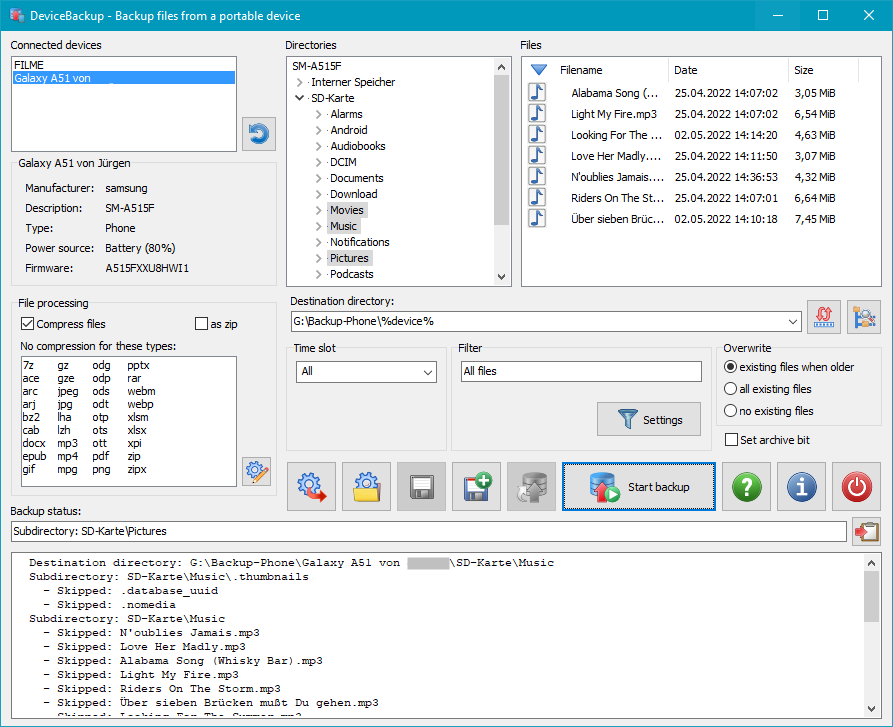
At the top left window, all connected portable devices are listed. By clicking an entry, the folder tree of the selected device will be displayed in the center window. The first time this may take a little longer, because the list has to be rebuilt completely. Below the device list, the most important properties of the selected device are displayed. After clicking one of the folders, the files found there will be listed in the rightmost window.
The selection of the files to be backed up is made on a by-folder basis. All sub-folders and its files are included automatically. The desired folders are selected by click resp. Ctrl-click.
Optional the files can be compressed on backup as it is known from Personal Backup.
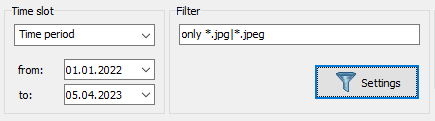
If desired, the selection of files can be restricted:
The directory to which the files are to be saved is selected in the usual way using a dialog. As known from Personal Backup, you can insert placeholders for date and time. In addition, there is a new placeholder %device% to include the name of the portable device in the destination directory.
Finally, you can specify whether files already present in the destination directory should be overwritten or not. Using the setting existing files when older an existing backup can be updated.
Clicking this button will start the backup.
This feature allows files that have been deleted from the mobile device to
be removed from the backup as well. If the backup is stored on a local hard drive,
you can optionally move the files to the Windows Recycle Bin so that
you can restore them if necessary.
After clicking the button, the backups of the selected directories
are scanned, and a list of files that are no longer present on the mobile device
is then displayed (see also here).
Before the actual deletion process begins, you can double-check
here to ensure the selection is correct. Optionally, you can deselect individual directories
and/or files.
The backup history is displayed in the lower part of the program window. It shows the destination directory and the individual directories that have been backed up. In addition, for each file found it is shown whether it was copied or updated or if it was skipped, because a current file version already exists in the destination directory.
By clicking on one of the buttons at the bottom left, all settings made in this way can be saved to a file and loaded from it again later at any time.
To quickly start a backup of data on a portable device, a desktop shortcut can be created. Double-clicking on it loads the corresponding configuration from the task file and checks whether the device specified there is connected and ready. If not, the user is prompted to do so. After that, the data backup starts automatically.
Calling the program via a desktop shortcut, a batch script or invoking it from another program (e.g. Windows Task Scheduler), you can control it by using the following command line options.
"%ProgramFiles%\Personal Backup 6\DeviceBackup.exe" [TaskFile] [Options]
Note: all options can be abbreviated but must be distinct: e.g. /force = /f = /for
| /close | /force | /lang | /design |
| xx = de | German | xx = it | Italian | xx = nl | Dutch | xx = ru | Russian | |||
| xx = en | English | xx = es | Spanish | xx = hu | Hungarian | |||||
| xx = fr | French | xx = pt | Portuguese | xx = pl | Polish |
| xxx = plain | Design with plain icons |
Important note: If a task filename contains spaces, the whole option must be enclosed by quotation marks as for example "My Backup".