|
|
|
When starting the program for the first time after installation, it will check whether
Personal Backup has already been used on the computer. If so, all settings
and tasks from there will be transferred. Then the
Control panel
of the program will open and present the
user's backup tasks
and associated time schedules
⇒ more information.
On updating from version 5, some specifics are
to be considered.
If Personal Backup has just been installed for the first time, the user will be asked if he wants to customize the program preferences, for example whether the files should be backed up as 1:1 copy or in compressed form by default. After that he will be prompted to create a first new backup task (see below).
the previous version Personal Backup 5 is already installed on the computer. If so, all settings and tasks from there will be transferred to Version 6 andA backup task contains information about what to be backed up
and how and where the backed-up data shall be stored. The task will be saved as a file
using the extension buj and can be started manually
at any time to perform a data backup.
In addition, you can specify time schedules for automatic data backups.
These settings are made separately from the backup tasks so that it is possible
to use more than one time schedule for the same backup, for example at a specified time
of day and on logoff.
Another option for starting backups automatically is to use
Windows Task Schedules. The advantage of this method
is that backups can be started even without user login (e.g. on a server).
You have the choice to do this using the wizard (recommended for less-experienced users) or to configure the backup manually.
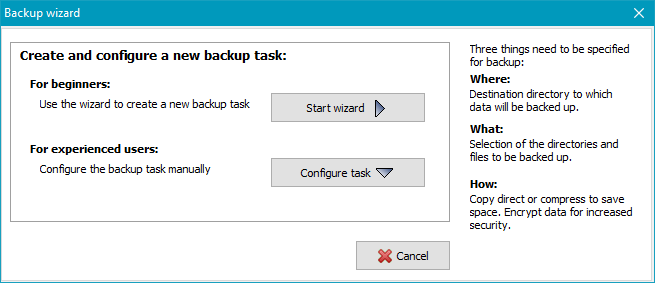
The wizard will lead you through the basic settings. The default value for the backup mode is Update which will ensure that only changed or previously non-existent files will be backed up.
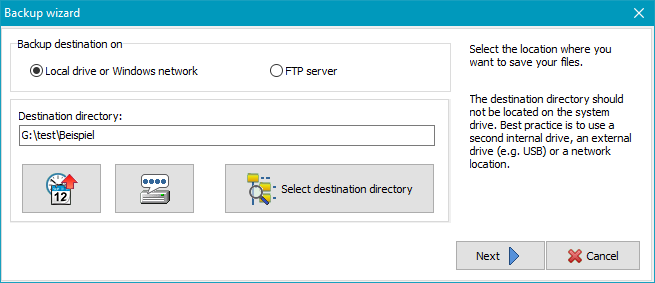
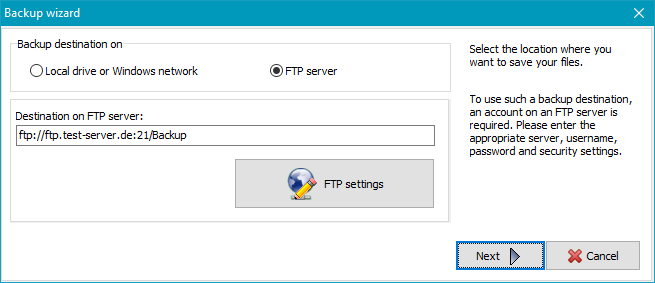
You have the following choices for the backup destination: on a local drive or Windows network or on an FTP server:
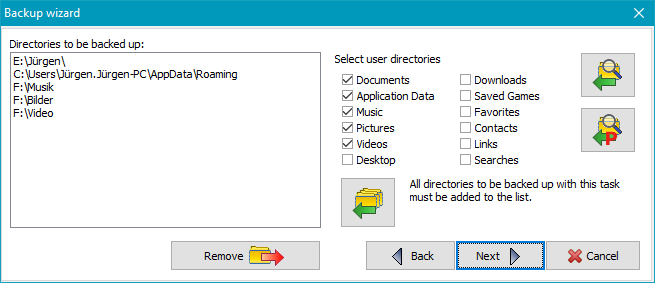
The selection is made directory by directory which means that all files of each
selected directories will be backed up. The selection can be refined later at any time
by specifying filters for subdirectories,
file names and
file types. For quick selection the following
buttons are provided:
![]() All basic user directories (Documents, Application Data,
Downloads, etc.) are already preselected and can be added to the list simply by
clicking the button.
All basic user directories (Documents, Application Data,
Downloads, etc.) are already preselected and can be added to the list simply by
clicking the button.
![]() Some applications (for example Starmoney) save their data in the directory
Program Data. By clicking the button, the desired subdirectory can be
selected and added to the list.
Some applications (for example Starmoney) save their data in the directory
Program Data. By clicking the button, the desired subdirectory can be
selected and added to the list.
![]() By clicking this button, any other directory can be selected for backup.
By clicking this button, any other directory can be selected for backup.
Then select how the files are to be stored in
the destination directory: as single files using a directory structure
true to original or as zip archives. On backing up to single files the user
can select if files should be copied with or without
compression.
In addition you can specify if the files should be
verified and/or
encrypted during backup. The password
to be used for the optional encryption is then requested and saved with the task.
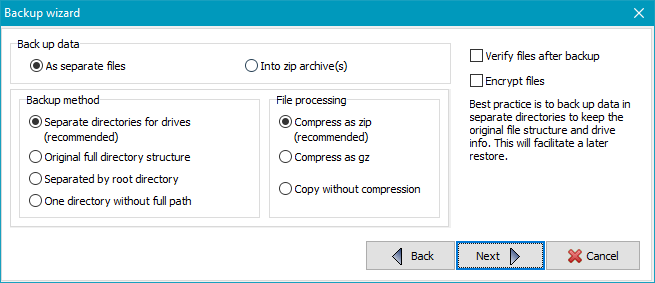
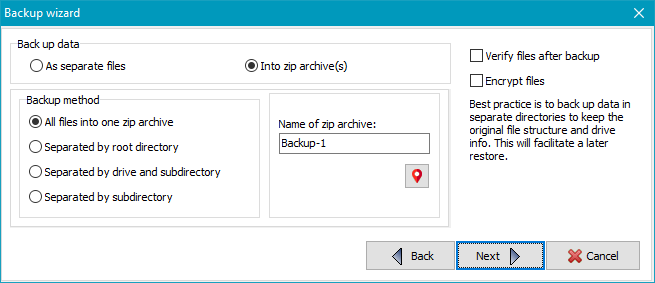
Finally, you can specify whether you want to start the new backup automatically under a selection of conditions (more ..).
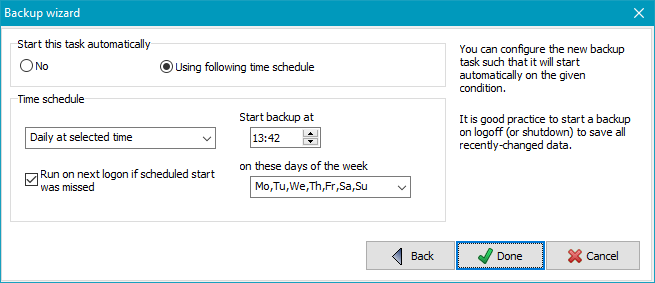
Click the Done button to store and complete the new task. The wizard
will be closed and the task edit window
be displayed for a final check. If there are no special requirements for the backup,
all other settings, such as security copies
or e-mail dispatch, can be left at
their default values. After closing the window, the new backup task will
be added at the beginning of the task list in the
Control Panel.
To start the new backup, just click the
Start backup button.