|
|
|
The control panel is a new feature introduced with Version 6 and will inform you about all your configured backup tasks and the associated time schedules for automatic backups in a clearly-arranged form. In addition, you can edit time schedules, configure backups using Windows Task Scheduler as well as call additional tools for restore and verification of backed-up data and to clean up backup directories.
You can select the desired function by clicking the buttons on the tool bar on the left of the window. On the right, the associated details will be displayed.

All user-configured backups are displayed as a list.
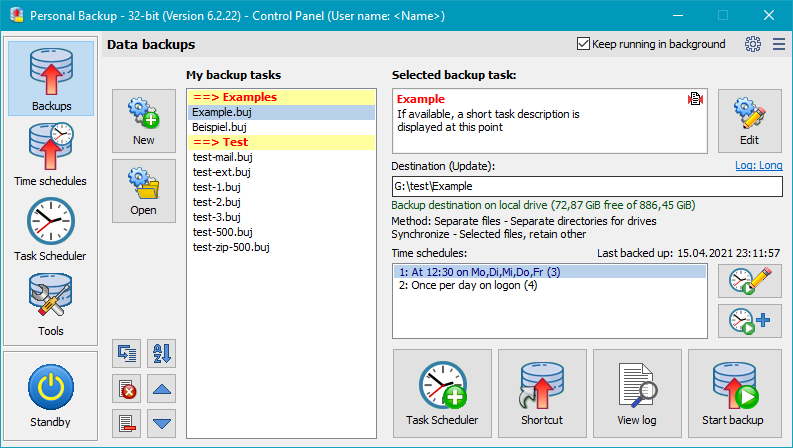
The list My backup tasks shows all tasks created by the user. Using the buttons New and Open (to the left) you can add a new backup task or an already-saved task to the list. Clicking on a list entry will show the associated details on the right:
Further information will be shown when moving the mouse over the particular field:
![]() Create new task: Clicking the New button will start the
wizard for creating a new backup task. This
will be inserted as a new entry at the beginning of the list.
Create new task: Clicking the New button will start the
wizard for creating a new backup task. This
will be inserted as a new entry at the beginning of the list.
![]() Add tasks to list: Clicking the Open button will provide
access to one or several backup tasks already saved as
buj files to the list.
Add tasks to list: Clicking the Open button will provide
access to one or several backup tasks already saved as
buj files to the list.
![]() Edit task: To edit the properties of the selected backup task, click the button at the top right.
A dialog will open where you can, for example, add other
directories for backup or modify the file selection or any
other setting.
Edit task: To edit the properties of the selected backup task, click the button at the top right.
A dialog will open where you can, for example, add other
directories for backup or modify the file selection or any
other setting.
![]()
![]()
![]()
![]()
![]()
![]()

On the right of the list showing the time schedules associated
with the selected task you will find two buttons to configure these. Clicking the upper button will
show the details of the selected schedule (here: 2: On logoff ...) for editing,
whereas clicking the lower button will add a new additional schedule associated with the selected
task ⇒ more information.
 Task scheduler: The currently-selected backup tasks will be
added to Windows Task Scheduler
to be performed automatically according to the specified time schedule. If this
task is already registered. the time schedule can be edited
⇒ more information.
 Shortcut: A shortcut on the computer desktop for the currently-selected
backup tasks (even several) will be created. By single double-clicking thereon these backups will
be started automatically one after another. In addition, you can specify a subsequent
action like shutting down the system
⇒ more information.
 View log: A viewer window will
open to show the log file belonging to the
currently-selected backup task. You can inspect the log and print it if required.
 Start backup: Depending on how many backup task are selected in the list,
the further procedure is different:

This item brings together the functions for restore, verification and cleanup of files which can optionally also be saved as task files. When selecting a particular function, a list of the associated tasks that were created and saved by the user is shown. In addition, similar to the backup tasks (see above), the details of the selected task are displayed on the right.

A summary of all user-configured restore tasks is displayed.
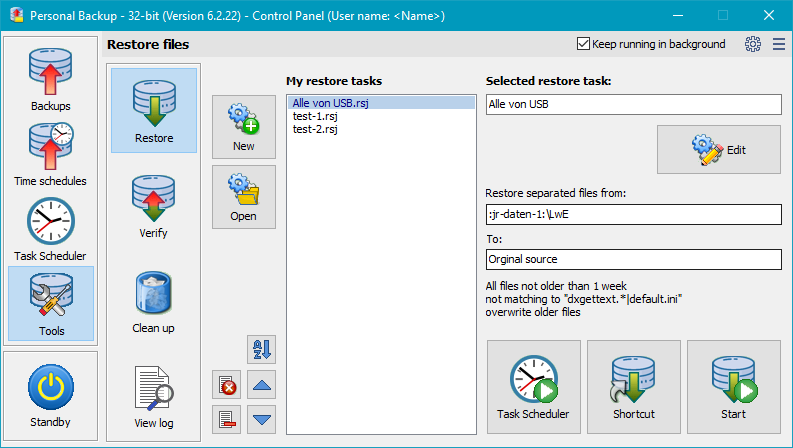
Using the buttons New and Open (to the left of My restore tasks) you can add a new restore task or an already-saved task to the list. Clicking on a list entry will show the associated details on the right:
Using the buttons below to the left, you can change the order of the entries and delete selected or all entries from the list. In so doing, only the list entries but not the task files will be deleted. At any time, you can add a saved task file to the list again by clicking the Open button.
To edit the selected restore task, click the button at the top right. A dialog will open where you can change the settings for this task.
Notes on creating a new restore: When clicking the New button, the important settings for the restore, such as backup directory, settings for compression and encryption and the backup method, will be predefined as specified in the currently selected backup task. The user need only specify where to restore (to the original or to any other directory), if all files or only those of a specified age are concerned and if files already existing shall be overwritten. You will find more information in the detailed description.
Below you will find buttons for the following functions:

A summary of all user-configured verify tasks is displayed.
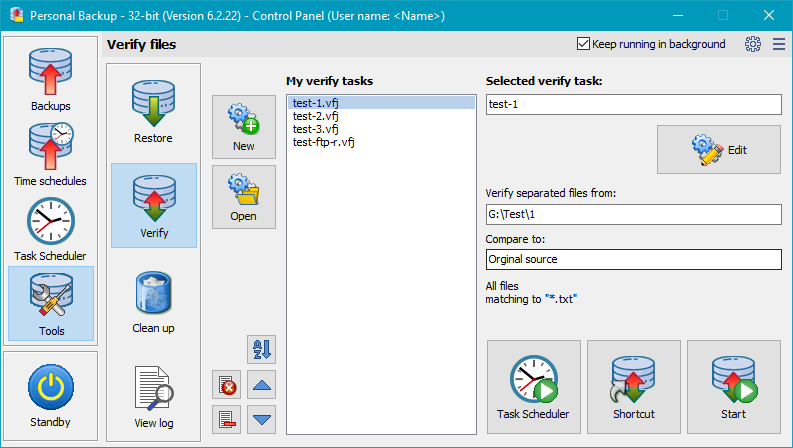
Using the buttons New and Open (to the left of My verify tasks) you can add a new verify task or an already-saved task to the list. Clicking on a list entry will show the associated details on the right:
Using the buttons below to the left, you can change the order of the entries and delete selected or all entries from the list. In so doing, only the list entries but not the task files will be deleted. At any time, you can add a saved task file to the list again by clicking the Open button.
To edit the selected verify task, click the button at the top right. A dialog will open where you can change the settings for this task.
Notes on creating a new verification: When clicking the New button, the important settings for the verification, such as backup directory and the backup method, will be predefined as specified in the currently selected backup task. The user need only specify how to verify (comparison with the original or any other selected directory) and if all files or only those of a specified age are concerned. You will find more information in the detailed description.
Below you will find buttons for the following functions:

A summary of all user-configured cleanup tasks is displayed.
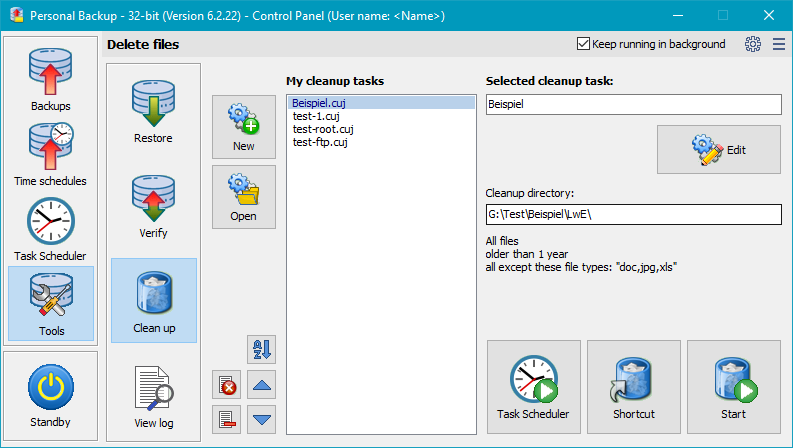
Using the buttons New and Open (to the left of My cleanup tasks) you can add a new cleanup task or an already-saved task to the list. Clicking on a list entry will show the associated details on the right:
Using the buttons below to the left, you can change the order of the entries and delete selected or all entries from the list. In so doing, only the list entries but not the task files will be deleted. At any time, you can add a saved task file to the list again by clicking the Open button.
To edit the selected cleanup task, click the button at the top right. A dialog will open where you can change the settings for this task.
Notes on creating a new cleanup task: When clicking the New button, the important settings for the cleanup, such as backup directory, will be predefined as specified in the currently selected backup task. The user need only specify whether he wants to delete files as result of a synchronization with the original or any other directory or if he wants to delete all files matching to special filter conditions, such as text patterns and/or age. You will find more information in the detailed description.
Below you will find buttons for the following functions:
 View log
A viewer window will open to show the default log file. Clicking the appropriate button will print out or delete the log file. Additionally, you can search for the beginning of a backup section (blue arrows), backup errors (red arrows) or any other text. To copy the whole text to the clipboard, no text selection is required. For part of the text, select a section and type Ctrl+C or Ctrl+Ins on your keyboard.

When you exit the program, all preferences including your selections for automatic backup will be saved.

If at least one of the options for Automatic backups on logoff or at time of day is selected and/or Show icon in notification area is checked, the program will remain running in the background and an icon will appear in the Windows notification area (see below).
If at least one of the automatic 16 tasks is activated as time controlled or at logoff,
this box will be checked by the program and the Personal Backup will not be
terminated when closing the main window, but will continue running in the background. An
![]() icon will then be
displayed in the Windows notification area (usually at the bottom right-hand
corner of the screen). Under Windows 7 and newer this icon may initially be hidden, in
which case click the arrow adjacent to the notification area to view all hidden
icons. To show the icon permanently (recommended), click on the icon and drag it from the
hidden list to the notification area.
icon will then be
displayed in the Windows notification area (usually at the bottom right-hand
corner of the screen). Under Windows 7 and newer this icon may initially be hidden, in
which case click the arrow adjacent to the notification area to view all hidden
icons. To show the icon permanently (recommended), click on the icon and drag it from the
hidden list to the notification area.
Furthermore, the program adds a shortcut to the startup folder of the Windows start menu
to be started automatically on next user logon if at least one automatic task
(time-triggered or on logon/logoff) is active. If the user is logged on as administrator
and at least one automatic task is using a Volume Shadow Copy,
in addition the Run as administrator flag of this link will be set.
Left-clicking the icon in the notification area will show a
list of all pending automatic backups,
right-clicking it will call a context menu
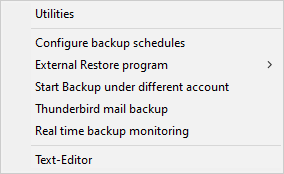
from which one of several actions can be initiated (e.g. backup, logoff).
After double-clicking a saved task file, this dialog will ask whether you wish to open the Control Panel, edit the task or start the associated backup immediately:

