|
|
|

In addition to the possibilities built into the program for starting automatic backups, you can also achieve this by using Windows Task Scheduler. This method can have certain advantages:

Scheduled backups: The list shows all Windows scheduled tasks using Personal Backup
together with their last and next run times. A colored ball indicates if the last
backup was performed duly (green) or not (red).
Moving the mouse over red ball will display the reason for the error as balloon hint.
To get more information in case of failure, open Windows Task Scheduler from
the system start menu and look into the History (this must be enabled before
by an administrator under Actions at the right).
A right click on the list will open a context menu to edit, delete or
start a scheduled task.
Time schedules: Beneath the listing, the time schedules (also called triggers in Windows) are displayed. If there are more than one schedule, a click on the arrow buttons at the right lets you select one of them.
Add schedule: Click the
![]() button to add
a new schedule (e.g. on other days of the week)
to the selected backup (see).
button to add
a new schedule (e.g. on other days of the week)
to the selected backup (see).
Delete schedule: Click the
![]() button to
delete the selected schedule.
button to
delete the selected schedule.
Personal Backup 6 supports the extended features of Windows Task Scheduler available since Windows Vista. Therefore, if using the program under Windows XP, the Windows Task Scheduler wizard will not work.
 |
Click this button to select the backup tasks. Then, the wizard will be opened to create a new scheduled task. |

Optionally you can add further backup tasks by clicking the folder
button to the right of the Tasks (Backup) field. In addition to the program
defined command line parameters, the user can add his own selection of options.
A special start directory (normally not required) and a separate
ini file for this backup can be
specified if so desired.
The backup log will be written to the file specified in the
task options (default: Persbackup.log).
If no path is specified here, the ini file path will be used.
The following additional options can be selected to determine the behavior of the
program. For your information, they will automatically be displayed in the field
Command line parameters as entered in the Windows Task Scheduler.

Click the Next button to configure the schedule.

The main options are similar to those in the Windows scheduled task wizard.
To initiate a daily backup, first select the time of day this is to start and
on which date (default being the current date). By default, the backup
starts every day but optionally a preset number of days can be skipped
(Advanced settings).
To enter the user account data click on Next.

The start time and start date can be selected as described above for a daily
schedule. The backup can be started every week (default) or can skip a preset
number of weeks. In addition you can determine on which days of the week the
backup is to be performed. Clicking the upper right button will open the
Extended settings (see above).
To enter the user account data click on Next.


The start time and start date can be selected as described above for a daily
schedule. The backup can be started on particular days of the selected months
or on particular days of selected a week of the selected months. Clicking the
upper right button will open the Extended settings (see above).
To enter the user account data click on Next.
One time only:

The backup is to be started once at a selectable time on a selectable date
(Advanced settings).
When the user logs on:
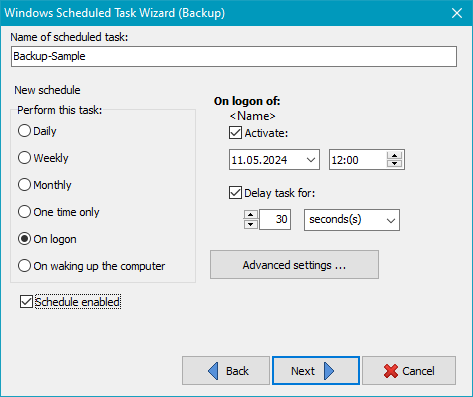
The backup is to be started whenever the user registered for this task logs on
(Advanced settings).
On waking up the computer:
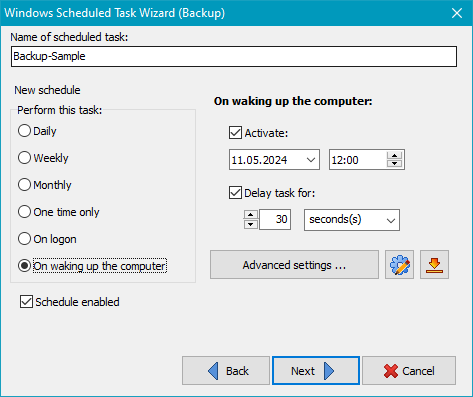
The backup is to be started when the computer wakes up from hibernation or standby mode.
The two buttons to the right of Advanced settings are intended
for experienced users. The one on the left opens a text editor in which the Windows event
to be monitored can be adjusted, e.g. if the backup is to be started when a different
system event occurs. The right button resets the settings to the default (when waking up).
The following optional settings can be made for all schedules:


At this point you can edit the description of the task (Default:
This task was created by Personal Backup).
Finally, you must define how the task is to be started:
Clicking the Done button inserts this new or changed task into the list of Windows scheduled tasks and closes the wizard. You can inspect the task settings directly from Personal Backup (see below) or by using the Windows functions All Programs ⇒ Accessories ⇒ System Tools ⇒ Task Scheduler or via Control Panel ⇒ Administrative Tools ⇒ Task Scheduler.
You can configure a Windows scheduled task to carry out an automatic Verify. The settings for verification must be saved as a file beforehand. Configuring the time schedule is the same as described above for backups.
You can configure a Windows scheduled task to carry out an automatic Restore. The settings for restore must be saved as a file beforehand. Configuring the time schedule is the same as described above for backups.
You can configure a Windows scheduled task to carry out an automatic Cleanup. The settings for cleanup must be saved as a file beforehand. Configuring the time schedule is the same as described above for backups.
 |
Click this button to open the scheduled task selected in the list and to reconfigure its settings. If no task is selected, the dialog shown below will open to show a summary of all scheduled tasks. |
 |
Click this button to delete the scheduled task selected in the list. If no task is selected, the dialog shown below will open to show a summary of all scheduled tasks. |
| After clicking on this button, the settings of a scheduled task saved in an XML file (see below under Export) can be loaded and activated. |
| After clicking on this button, the settings of the selected task are saved in an XML file.
They can be imported later at any time to create a new task (see above under Import). The format of this file is documented by Microsoft. |
![]() The backup from the selected scheduled task swill be opened for editing.
The backup from the selected scheduled task swill be opened for editing.
![]() The selected backup is started immediately outside the schedule.
The selected backup is started immediately outside the schedule.

Only tasks registered in Windows Task Scheduler involving Personal Backup are displayed in the Select Scheduled Task dialog box (see screenshot above). A colored ball indicates if the last backup was performed duly (green) or not (red). The properties of the selected task are displayed in the lower part of the window. Clicking the toggle switch on the right will enable or disable the selected task. Click one of the buttons on the lower right to initiate one of the following functions:
![]() Edit the settings for the selected scheduled task, e.g. the time schedule
(see above).
Edit the settings for the selected scheduled task, e.g. the time schedule
(see above).
![]() The selected scheduled task will be deleted.
The selected scheduled task will be deleted.
![]()
![]() Run the selected scheduled task immediately or stop it: If the selected
scheduled task is ready to run (left icon), clicking this button will start the task
immediately. If it is already running (right icon), the task will be stopped.
Run the selected scheduled task immediately or stop it: If the selected
scheduled task is ready to run (left icon), clicking this button will start the task
immediately. If it is already running (right icon), the task will be stopped.